

I found a great little pamphlet at Joann's to help me make sure I was on task. I also watched this great How To: Video by Design Sponge.
You can Google "how to make a headboard" and get an endless array of suggestions and ways to do it. I think there's really only one basic way but tips on how to make yours better than mine. Yep, better.
I used a 4" thick piece of foam. At the end of the project I realized My foam was too thick and my batting coverage should have been thicker instead. It is much harder to press down foam than batting. When stapling the fabric you have to yank that stuff around the edge and staple it. I made my headboard so tall and used such thick foam that my fabric really didn't reach around from top to bottom.
The biggest thing you need to do is FIRST figure out all the dimensions that will effect size
Here is how the sandwich looks:
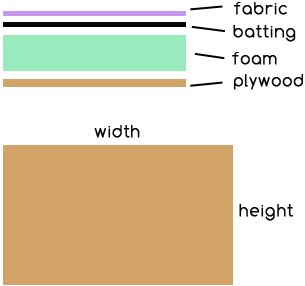
Your measurement equations should look like this:
(sandwich)2 + plywood height + 8 = Total fabric height needed
(sandwich)2 + plywood width + 8 = Total fabric width needed
the added 8 is the extra 4 inches on each side past the sandwich you use to pull the fabric and stretch around to the back of the board. My fabric did not even go past the foam on the top and bottom. There was A LOT of stretching which I'm pretty sure cause the rippling effect on parts of the fabric. You don't want that.
If you run into the same problem I did because you do not want to sacrifice the depth of the headboard make sure you pull the sides with more fabric as much as you pull the sides with just a little bit. The trade off is how taut the fabric might be. When it's super taut there is more of a chance more buttons could pop when your try to do the tufting. We had three or four buttons pop off towards the end, mostly because things were getting super tight and if the button wasn't perfectly made, in the factory, it was a little weak and couldn't handle the pressure.
Make all your marks if you want to do the tufting. Drill 1/4" holes in the spots you want them to be. The holes need to be big enough to pass your needle through with 20 gauge wire.
You'll nee to get 2x2's or 2x4's and mark them to fit in the bed frame holes. Measure twice! Sir Luke sunk the bolts in so they wouldn't bore into the wall. You'll want to wrap them up if you don't. Secure the legs to the board before you start the foam process.
Glue two pieces of foam together if your headboard is going to be taller than two feet. Use spray glue to fuse the two together. Once that's dried spray glue the foam to the board. Make sure your markings are on the side you're not gluing the foam to! It'll be easier to see the marked holes. I drew giant X's over the holes. Then use batting to cover the entire piece of foam front to back. Use a staple gun to attach it to the board.

Next you'll lay the fabric and begin stapling. It's SUPER important to staple on one side and then staple on the complete opposite side to keep the tension consistent.

I'm not going to lie, the tufting is a beast. So if you really intend to do it practice. This is a two person process. You'll need a 10" or 12" needle to go all the way through the giant piece of foam like I did. Push the needl through with a little over a foot and a half worth of wire from the back to the front making sure to leave about 6 inches of wire on the back side. Remove the needle. Add on the button (I got little diy button kits for Joann's so they matched my fabric). Pass the needle back to the person on the other side. They will send it back through but this time with the dull side first. This was tricky but you can break it through the fabric on the other side with the help of another needle guiding it near the first hole. Attach the wire to the needle and pull towards the back. Make sure to spray Fray check on the holes before you pull the button tight. The person on the front side pushes in the button as hard as they can while the person on the back twists the wire together (not too much!) and then staples it to the plywood, making sure it won't loosen. Repeat for all spots for buttons.
And there you have it! Headboard. It's a little crazy and definitely takes two people. If you'd like me to post the copy of the Joann's instructions let me know!
Happy DIYing!
Post Edit:The most expensive part of this project what the foam at $25/ft, which totaled close to $100. The thing is it's still cheaper to make this than buy it even with this pricey foam due to the size of the beast. The fabric was on sale at Joann's $3/yd. What I think is important to remember is you can make it EXACTLY what you want, not what's available in the store. And that's what's most important to me. Well, and cheap, cheap, cheap...
5 comments:
Wow, that looks great! At first I thought they were photos from a magazine!
Ques: So I think I read that the headboard is basically hooked to the wall, right? Is there a way to not have it on the wall? I would like to attach it to the bed some how because I change around the furniture in our room every so often.
Also: Was it pricey? Was it about how much you thought or more (as home projects usually are...)
Great job, I am super impressed. :)
Oh wait. Maybe yours is attached to the frame.. right?
Natalie, I'm going to update the post. I think I felt so wordy I didn't ad enough of price details.
But this instruction is attached to the bed NOT the wall.
I LOOOOVE IT! I would love to have a headboard just like it. Your room looks like it belongs in a design magazine! You should submit it somewhere! Great job. I'm totally bookmarking this for someday when I have my own place... :)
You did a fantastic job - your room is looking great. Can't wait to see the new drapes and sheers when you get them up!!
Love, Mom
Post a Comment